Lemon Meringue Pie – Tangy, Sweet, and Perfectly Fluffy
A Slice of Sunshine
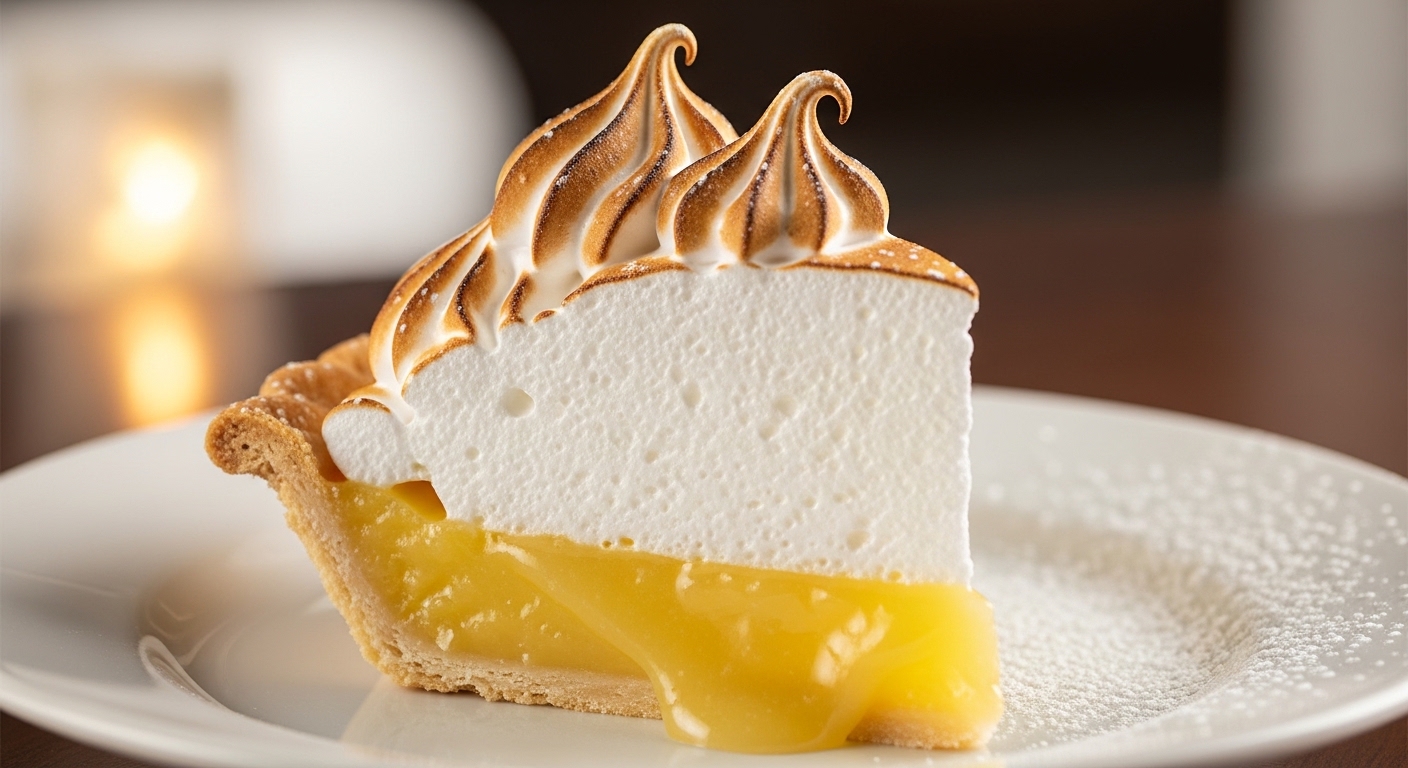
There is nothing quite as breathtaking as a Lemon Meringue Pie pulling fresh from the oven, its golden-toast peaks of meringue standing tall like tiny, edible clouds. The first slice reveals a vibrant, sun-drenched lemon filling that is both sharp and silky, nestled perfectly within a crisp, buttery crust. It’s a dessert that feels like a celebration—bright, sophisticated, and utterly irresistible.
Whether you’re looking to brighten up a rainy afternoon, anchor a spring brunch, or simply impress guests with a homemade masterpiece, this classic recipe captures the very essence of tang and sweetness in every bite. There are few desserts that can match the visual drama of a perfectly torched meringue, and when those golden peaks give way to the sunshine-yellow filling beneath, the effect is nothing short of spectacular.
The History of a Classic
Lemon Meringue Pie has been a beloved dessert for well over a century, though the individual components have even deeper roots. Lemon curd-style fillings appeared in English cookbooks as early as the 1700s, while meringue—a mixture of whipped egg whites and sugar—has origins debated between Swiss, French, and Italian pastry traditions. The genius of combining them into a single pie is often attributed to Elizabeth Goodwell, a 19th-century baker, though the dessert truly rose to prominence in American diners and bakeries during the early to mid-1900s. By the mid-twentieth century, Lemon Meringue Pie had become an icon of American baking—the kind of pie that grandmothers made from memory and that appeared on diner menus from coast to coast.
What has kept this dessert relevant through so many decades is its perfect flavor architecture. The tartness of the lemon, the sweetness of the meringue, and the buttery crunch of the crust create a three-part harmony that satisfies every taste bud simultaneously.
The Secret to the Perfect Balance
The magic of this pie lies in the contrast. The tartness of the fresh lemon juice cuts through the sweetness of the meringue, creating a flavor profile that is refreshing rather than cloying. Achieving that perfect, lofty meringue requires just a touch of patience, but the result is a dessert that looks like it belongs in the window of a Parisian patisserie.
The lemon filling itself is a form of lemon curd—a cooked custard thickened with cornstarch instead of the traditional butter-heavy method. The cornstarch gives the filling a clean, firm set that slices beautifully while still maintaining a smooth, spoonable texture. The key is cooking the filling long enough for the cornstarch to fully activate, which prevents any raw starchy taste and ensures the filling holds its shape when the pie is cut.
Step-by-Step Instructions
-
Prepare the Crust: Start with your favorite buttery pie crust, whether homemade or store-bought. Pre-bake (blind bake) it until it’s lightly golden and crisp. To do this, line the unbaked crust with parchment paper and fill it with pie weights or dried beans to prevent the bottom from puffing up. Bake at 375°F for about fifteen minutes, then remove the weights and bake for another five to eight minutes until the crust is golden. This provides the sturdy foundation needed to hold that luscious lemon filling without becoming soggy.
-
Make the Lemon Filling: In a medium saucepan, whisk together the sugar, cornstarch, and salt until evenly combined. Gradually pour in the water, whisking constantly to ensure no lumps form. Place over medium heat and cook, stirring continuously, until the mixture thickens and turns from cloudy to translucent—this usually takes about five to seven minutes. Once thick, remove from heat and temper in your beaten egg yolks by adding about a tablespoon of the hot mixture to the yolks first, stirring quickly, then pouring the tempered yolks back into the saucepan. Return to heat and cook for another two minutes, stirring vigorously. This tempering step prevents the eggs from scrambling. Remove from heat and stir in the fresh lemon juice and butter until smooth. Pour this liquid sunshine into your pre-baked crust while the filling is still warm.
-
Whip the Meringue: This is where the “cloud-like” magic happens. In a clean, dry bowl—any trace of grease or moisture will prevent the whites from whipping properly—beat your egg whites with the cream of tartar until soft peaks form. The cream of tartar is an acid that stabilizes the egg white foam, helping it hold its structure. Gradually add the sugar, one tablespoon at a time, and continue beating until the peaks are stiff, glossy, and proud. You should be able to hold the bowl upside down without the meringue budging. This is called stiff peak stage, and it is essential for meringue that holds its shape on the pie.
-
Top the Pie: Spoon the meringue over the warm lemon filling immediately after making it. Working with warm filling is important because it essentially begins cooking the bottom of the meringue, which helps prevent the formation of a weeping layer between the filling and the meringue. Carefully spread the meringue to the very edges of the crust—this “seals” the meringue and prevents it from shrinking or pulling away from the crust as it bakes. Use the back of your spoon to create those iconic decorative swirls and peaks, pulling the meringue upward into tall, dramatic points.
-
Bake: Place the pie in the oven at 350°F (175°C) for 10–15 minutes. Watch as the peaks turn a beautiful, toasted golden brown while the valleys remain white, creating a stunning contrast. The middle of the meringue should still feel soft and marshmallowy.
Pro Tip: Let the pie cool completely on a wire rack at room temperature, then refrigerate for at least four hours before slicing. This allows the lemon filling to set into a perfect, firm, sliceable consistency. Cutting the pie while warm will result in a running filling that pools on the plate.
Understanding Meringue: Common Problems Solved
Meringue can seem intimidating, but understanding the common issues makes it much more approachable:
- Weeping (liquid between meringue and filling): This usually happens when meringue is placed on cold filling. Always top the pie while the filling is still warm so the base of the meringue begins to cook immediately.
- Beading (droplets on the surface): This is caused by too much sugar or overbaking. Add sugar gradually and watch the oven closely.
- Shrinking meringue: This happens when the meringue isn’t sealed to the crust edges. Make sure to spread it all the way to the crust rim so it has something to anchor to during baking.
- Flat meringue: Make sure your bowl and beaters are completely clean and free of any grease or egg yolk. Even a small amount of fat prevents egg whites from whipping to their full volume.
Tips for a Perfect Pie
- Fresh is Best: Never use bottled lemon juice. The zing of fresh-squeezed lemons provides a depth and brightness that simply can’t be replicated. You’ll need about three to four large lemons for half a cup of juice.
- The Yolk Factor: When separating your eggs, be meticulous. Even a tiny drop of yolk in your whites will prevent them from whipping into those stiff, glossy peaks you’re looking for. Separate each egg over a small bowl first before adding the white to your mixing bowl—this way, if a yolk breaks, you haven’t ruined all your whites.
- Don’t Over-Bake: Keep a close eye on your oven. You want the meringue to be toasted on the tips but still soft and marshmallowy on the inside. If you have a kitchen torch, you can skip the oven entirely and torch the meringue for even more control over the browning.
- Room Temperature Eggs: Egg whites at room temperature whip to a greater volume than cold ones. Take your eggs out of the fridge about thirty minutes before you plan to make the meringue.
Variations to Try
- Extra Zest: For a pop of color and texture, finely grate some lemon zest over the finished meringue or add it directly into the lemon filling for a more intense citrus flavor.
- The Crust Swap: Try a graham cracker or shortbread crust for a more crumbly, sweet contrast to the acidic filling. A gingersnap crust is another fantastic option that adds a warm, spicy element.
- Flavor Twists: Add a hint of fresh ginger to the lemon filling or a splash of lime juice for a citrus medley that is uniquely yours. A tablespoon of limoncello stirred into the filling before pouring adds a sophisticated, boozy twist.
- Italian Meringue: For a more stable meringue that is less prone to weeping, make an Italian meringue by slowly pouring a hot sugar syrup into the whipping egg whites. This creates a cooked meringue that is silky smooth and incredibly stable.
Serving Suggestions
For a truly elegant presentation, serve your chilled Lemon Meringue Pie with a side of fresh raspberries or a drizzle of raspberry coulis. The red contrast looks stunning against the yellow and white layers and adds a fruity complement to the citrus filling. A light dusting of powdered sugar right before serving can also add a touch of fairytale finish to your dessert table.
Use a sharp knife dipped in hot water and wiped clean between each cut for the cleanest slices. The hot blade glides through the meringue and filling without dragging or squishing, giving you those bakery-perfect slices.
This pie isn’t just a treat — it’s a memory in the making, the kind of dessert that people remember and request again and again.

About the Author
Makutu Bright
Software engineer and founder of Cracipes. Based in Kumasi, Ghana. Uses AI to curate the best recipes from across the internet.
Learn More

Submission Received!
Your review is in the kitchen being moderated.