Decadent Chocolate Lava Cake: The Ultimate Molten Chocolate Experience
The Ultimate Chocolate Lovers’ Dream
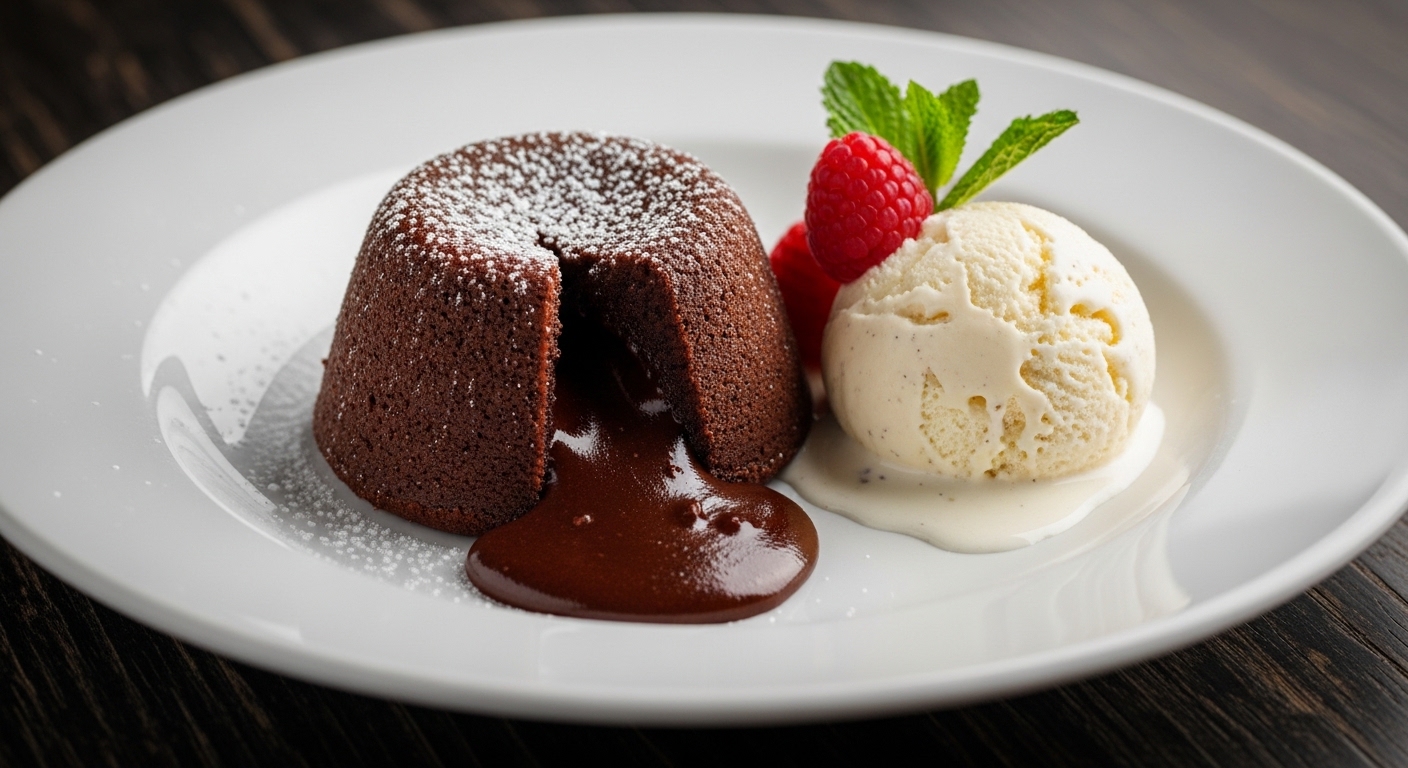
There is something truly magical about a Chocolate Lava Cake. From the outside, it looks like a modest, perfectly baked chocolate cake. But the moment your spoon breaks the surface, a rich, molten chocolate center spills out in a velvety wave of indulgence. It is the kind of dessert that transforms a simple dinner into an unforgettable occasion, and the best part is that it is far easier to make than most people think.
Whether you’re planning a romantic date night, hosting an elegant dinner party, or simply craving a decadent treat at home, this recipe is your ticket to a restaurant-quality experience in under 30 minutes. It’s warm, gooey, and absolutely unforgettable. Once you master this recipe, you will never need to order it at a restaurant again because your homemade version will taste even better.
The History Behind the Lava
The Chocolate Lava Cake, also known as molten chocolate cake or “fondant au chocolat” in French cuisine, has a surprisingly debated origin story. Some credit famous French chef Michel Bras, who created a similar dessert called “Coulant au Chocolat” in 1981 at his restaurant in southern France. Others attribute it to New York chef Jean-Georges Vongerichten, who claims to have accidentally invented it in the late 1980s by pulling a chocolate cake out of the oven before it was fully baked. Regardless of who deserves the credit, the result is a dessert that has become a staple on fine dining menus around the world. The genius of the dish lies in its paradox: a cake that is both baked and unbaked at the same time, creating a contrast of textures that is nothing short of extraordinary.
Ingredients for Perfection
To achieve that iconic lava flow, quality is key. Here is what you’ll need and why each component matters:
- Premium Chocolate: Use a high-quality baking bar rather than chocolate chips for the smoothest melt. Chocolate chips contain stabilizers that prevent them from melting evenly. A 60% cacao semi-sweet bar provides the ideal balance of bitterness and sweetness for this recipe.
- Unsalted Butter: Controls the saltiness of your dessert and contributes to the incredibly rich, moist texture. Using unsalted butter allows you to control exactly how much salt goes into the batter.
- Eggs & Extra Yolks: The secret to that rich, custardy center. The combination of whole eggs and additional yolks creates the structure that holds the cake together on the outside while keeping the center liquid and flowing.
- Powdered Sugar: Keeps the texture light and airy rather than dense and grainy. Granulated sugar can make the batter gritty, while powdered sugar dissolves seamlessly.
- Flour: Just enough to give the cake structure without turning it into a traditional cake. We use less flour than you might expect because we want the center to remain molten.
Step-by-Step Instructions
- Prep Your Ramekins: Preheat your oven to 425°F (218°C). Generously grease two 6-ounce ramekins with butter and dust with cocoa powder. This ensures your cakes slide out perfectly and adds a thin layer of extra chocolate flavor on the exterior. Tap out any excess cocoa powder and place the ramekins on a baking sheet for easy transport.
- Melt the Chocolate: In a microwave-safe bowl, combine the chopped chocolate and butter. Heat in 30-second increments, stirring between each burst, until completely smooth and velvety. Be patient here because overheating can cause the chocolate to seize and become grainy. Alternatively, you can use a double boiler method for more gentle, even heat.
- Mix the Base: Whisk in the powdered sugar until combined. Add the eggs, egg yolks, and vanilla extract, whisking vigorously until the batter is glossy and thick. This step is important because the air you incorporate here contributes to the slight rise of the cake in the oven.
- Fold in Flour: Gently fold in the flour and a pinch of salt. Do not overmix! You want the batter just combined to keep it tender. Overmixing develops the gluten in the flour, which would give you a tough, chewy cake rather than the delicate, silky texture we want.
- Bake to Perfection: Divide the batter between the ramekins, filling them about three-quarters full. Bake for 12–14 minutes. The edges should be firm and slightly pulled away from the sides, but the center should still look slightly soft and jiggly when you gently shake the pan. This is the most critical step in the whole recipe.
- Rest and Invert: Let the cakes cool in the ramekins for exactly 1 minute—no more, no less. Place a plate over the top and carefully invert. Let it sit for 10 seconds, then lift the ramekin to reveal your masterpiece. If the cake sticks, run a thin knife around the edge before inverting.
Tips & Tricks for the Perfect Lava
- Don’t Overbake! This is the golden rule. Every oven is different, so start checking at 11 minutes. If the top is no longer wet but the center remains soft, it’s ready. An overbaked lava cake is just a regular chocolate cake, and while that is still delicious, it defeats the purpose.
- Chocolate Choice: For a deeper, more intense flavor, use dark chocolate (70% cacao). If you need a gluten-free version, a 1:1 gluten-free flour blend works beautifully here since we use so little flour anyway.
- Prep Ahead: You can make the batter and divide it into ramekins up to 6 hours in advance. Just store them covered in the fridge and add 1-2 minutes to the baking time to account for the cold batter. This makes this recipe ideal for dinner parties because you can prepare everything before your guests arrive and simply pop them in the oven during the main course.
- Restaurant Plating: Wipe away any stray crumbs from the plate and place the cake slightly off-center to leave room for a scoop of ice cream. A clean plate with intentional negative space looks far more professional than a crowded one.
- The Temperature Test: If you have an instant-read thermometer, the center should register about 160°F (71°C) when the lava is perfectly molten.
Understanding the Science Behind the Lava
What makes this cake work is the precise balance of heat and timing. The outside of the cake bakes fully because it is in direct contact with the hot ramekin, but the center stays liquid because the baking time is too short for the heat to penetrate all the way to the middle. The eggs in the batter set on the outside, creating a structure that holds the cake together when inverted, while the interior remains essentially a warm chocolate ganache. Understanding this principle means you can adjust the recipe to your oven. If your first attempt comes out fully baked, reduce the time by a minute. If the cake collapses when inverted, add a minute.
Serving Suggestions
To make this truly memorable, presentation is everything:
- The Classic Pairing: A large scoop of cold vanilla bean ice cream creates a stunning temperature contrast with the warm cake. The moment the cold ice cream meets the hot chocolate lava is pure dessert poetry.
- Berry Fresh: Add a handful of fresh raspberries or a sliced strawberry to cut through the richness with a bit of acidity. The bright red against the dark chocolate is also visually stunning.
- The Finishing Touch: A simple dusting of powdered sugar or a sprig of fresh mint makes the dark chocolate colors pop. Use a fine-mesh sieve for an even, elegant dusting.
- Beverage Pairing: Serve with a strong espresso or a glass of dessert wine like a Ruby Port. The bitterness of the coffee or the sweetness of the port complements the richness of the chocolate beautifully.
- Salted Caramel Drizzle: For a modern twist, add a few spoonfuls of warm salted caramel sauce around the plate. The salt enhances the chocolate flavor while the caramel adds another layer of sweetness.
Why This Dessert Never Gets Old
This Chocolate Lava Cake is more than just a dessert—it’s an experience. It’s surprisingly straightforward to make, yet it never fails to impress. The combination of the crispy exterior and the warm, flowing chocolate center creates a sensory moment that will have your guests talking long after the last bite. Once you’ve made this recipe a few times and found the perfect timing for your oven, it will become your signature dessert—the one everyone asks you to bring to every gathering.

About the Author
Makutu Bright
Software engineer and founder of Cracipes. Based in Kumasi, Ghana. Uses AI to curate the best recipes from across the internet.
Learn More
Submission Received!
Your review is in the kitchen being moderated.