The Perfect Red Velvet Cupcakes: Moist, Vibrant, and Utterly Decadent
A Celebration in Every Bite
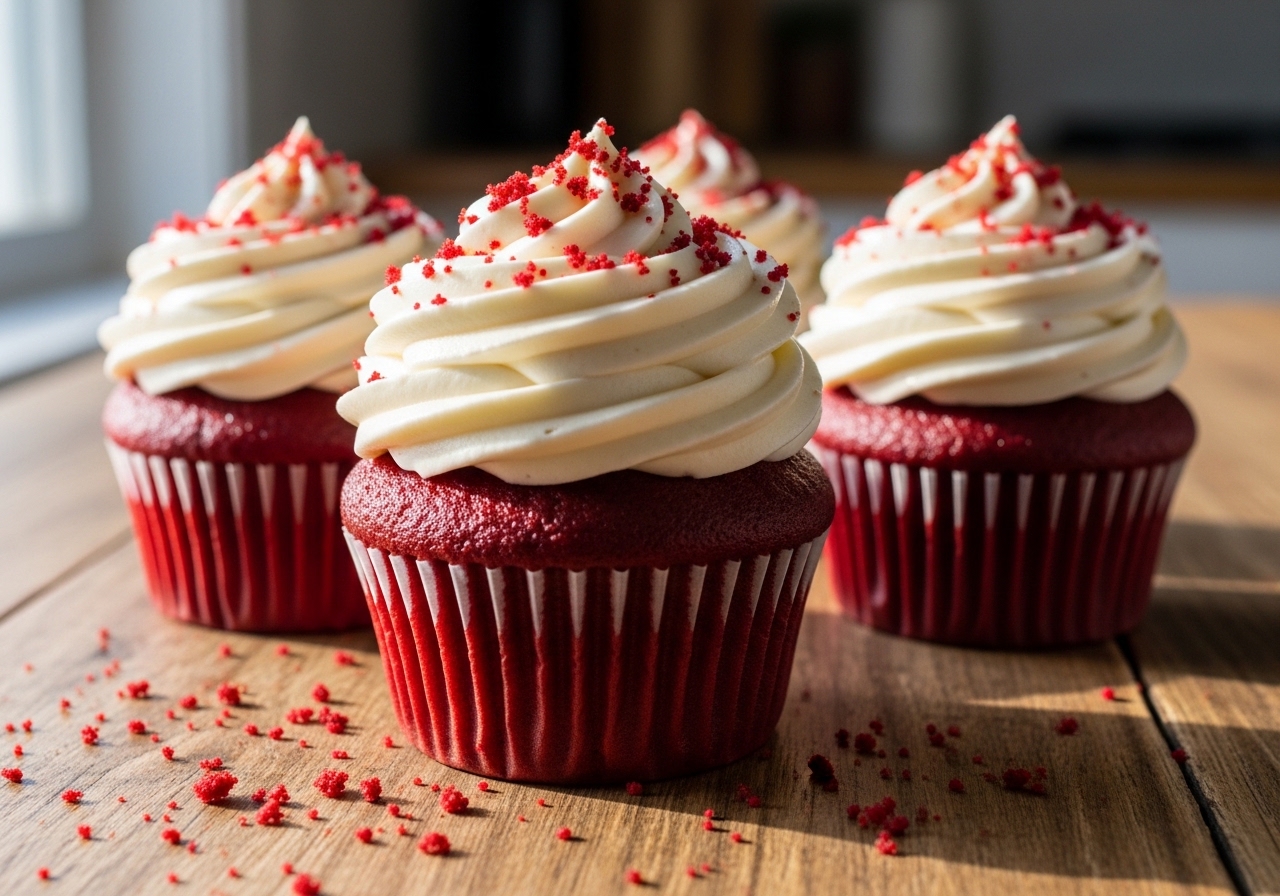
There is something undeniably luxurious about a Red Velvet Cupcake. With its deep, vibrant crimson sponge and a crown of snow-white, silky Cream Cheese Frosting, it’s a dessert that demands attention. Whether you’re baking for a big birthday bash, a romantic celebration, or just a cozy afternoon treat at home, these cupcakes are the ultimate showstoppers that look every bit as incredible as they taste.
The flavor is a beautiful mystery—a subtle hint of cocoa paired with a slight tang from the buttermilk, resulting in a moist cupcake that is soft, velvety, and incredibly indulgent. Red velvet is not simply chocolate with food coloring, as many people assume. It occupies its own unique category—a delicate, buttery cake with just enough cocoa to give it depth without overpowering the other flavors, balanced by the tanginess of buttermilk and vinegar that makes the crumb exceptionally tender.
The Fascinating History of Red Velvet
The origins of red velvet cake are more interesting than you might expect. The “velvet” cakes of the Victorian era were known for their smooth, fine-grained texture, achieved through the use of cocoa and specific mixing techniques. The original red color actually came from a chemical reaction between the cocoa powder and the vinegar and buttermilk in the recipe—natural cocoa powder contains anthocyanins that turn reddish when exposed to acid. During World War II, when ingredients were scarce, bakers began using beet juice to enhance the color and add moisture, which also boosted the red hue.
The modern red velvet cake, with its vivid crimson color achieved through food coloring, was popularized by the Adams Extract company in Texas, which included a red velvet cake recipe on their food coloring bottles. The cake experienced a massive resurgence in the early 2000s, partly thanks to the famous “Armadillo Groom’s Cake” scene in the film Steel Magnolias and later through its constant presence on baking shows and social media. Today, red velvet is one of the most popular cake flavors in the world, and the cupcake version is arguably even more beloved than the full-sized cake.
Ingredients Overview: The Vibrant Core
The magic of red velvet lies in its unique chemistry. Here is what makes these cupcakes so special:
- The Velvet Sponge: A delicate balance of flour, sugar, and a touch of cocoa powder. The addition of buttermilk and vinegar creates a chemical reaction with the baking soda that keeps the crumb incredibly tender and moist. The acidity also helps develop the slight tang that is characteristic of red velvet.
- The Signature Red: We use high-quality red food coloring to achieve that iconic, eye-popping hue. The amount of cocoa in the recipe is deliberately small—just enough to add flavor complexity without turning the cupcake brown.
- Vegetable Oil Over Butter: Unlike many cake recipes that use butter, red velvet traditionally uses oil. Oil creates a moister, more tender crumb because it remains liquid at room temperature, while butter solidifies. This is why red velvet cupcakes stay moist for days after baking.
- The Dreamy Frosting: A rich, tangy, and sweet blend of cream cheese and real butter. It’s whipped until it reaches a cloud-like consistency that’s perfect for swirling into dramatic peaks.
Step-by-Step Preparation: Baking the Magic
- Prep Your Pans: Preheat your oven to 350°F (175°C) and line a 12-cup muffin tin with cupcake liners. Use high-quality parchment liners, which prevent sticking better than standard paper liners and keep the cupcakes looking neat.
- Whisk the Dry: Start by sifting your flour, sugar, baking soda, and cocoa powder into a large bowl. Sifting is not optional here—it removes any lumps and aerates the dry ingredients, contributing to a lighter, more even crumb. Whisk everything together to ensure the baking soda and cocoa are evenly distributed throughout the flour.
- Combine the Wet: In a separate jug or bowl, whisk together the buttermilk, egg, vegetable oil, vinegar, vanilla extract, and that vibrant red food coloring. The mixture will be a stunning bright red that promises the visual drama to come.
- The Great Merge: Slowly pour the wet ingredients into the dry, whisking gently until the batter is smooth and beautifully crimson. Don’t overmix—stop as soon as you no longer see streaks of flour. Overmixing develops gluten, which makes cupcakes tough rather than tender.
- Bake to Perfection: Fill your cupcake liners about two-thirds full—this allows room for the cupcakes to rise into a gentle dome without overflowing. Bake at 350°F for about 18 to 20 minutes. Your kitchen will smell like a gourmet bakery! To test for doneness, insert a toothpick into the center—it should come out with just a few moist crumbs, not wet batter.
- The Cooling Phase: Let the cupcakes cool in the pan for five minutes, then transfer them to a wire rack to cool completely. This is crucial because frosting warm cupcakes will cause the frosting to melt and slide off. Complete cooling usually takes about 30 to 45 minutes. Be patient—it is worth the wait.
- The Frosting Swirl: Beat the softened cream cheese and butter together with an electric mixer until completely smooth, about two minutes. Scrape down the sides of the bowl, then slowly add the powdered sugar, one cup at a time, beating on low speed after each addition to prevent a cloud of sugar dust. Add the vanilla extract and beat on medium-high for a final minute until the frosting is light, fluffy, and smooth. Use a piping bag fitted with a large tip to create those signature high swirls of Cream Cheese Frosting.
Tips & Tricks for Perfect Cupcakes
- Vibrant Color: If you want an even deeper red, use gel food coloring instead of liquid. Gel coloring provides a more concentrated color without adding extra liquid that changes the batter’s consistency. You’ll need much less gel coloring to achieve the same or even more vibrant result.
- Smooth Frosting: Ensure both your butter and cream cheese are at room temperature before mixing to avoid any lumps. Cold cream cheese creates a lumpy frosting that no amount of mixing can fully smooth out. Set them out on the counter for at least an hour before you begin.
- The Perfect Swirl: Use a large open-star tip (like Wilton 1M) for that classic, bakery-style finish. Start piping from the outside edge and spiral inward toward the center, then pull straight up to create a peak. Practice on a plate first if you’re new to piping.
- Moisture Secret: Don’t overbake! A toothpick should come out with just a few moist crumbs attached—not clean. Cupcakes continue to cook from residual heat after being removed from the oven, so pulling them out slightly early actually results in a perfectly baked cupcake.
- Even Baking: Use a cookie scoop or measuring cup to portion the batter evenly into the liners. This ensures all cupcakes bake at the same rate and you don’t end up with some overdone and others underdone.
Creative Variations
Want to put a twist on the classic? Try these inspirational ideas:
- Chocolate Chip Surprise: Fold mini chocolate chips into the batter for a bit of crunch and melty chocolate pockets throughout the cupcake.
- Gilded Glamour: Add a sprinkle of gold leaf or edible glitter to the top of each frosted cupcake for a truly luxe celebration look that is perfect for New Year’s Eve or milestone birthday parties.
- Heart of Gold: Add a hidden center of raspberry jam or chocolate ganache by filling the liner halfway with batter, adding a small spoonful of filling, then topping with more batter. When guests bite in, they discover a delightful surprise.
- Cream Cheese Stuffed: Place a small cube of sweetened cream cheese mixture in the center of each cupcake before baking for an extra creamy center that practically melts on your tongue.
- Red Velvet Cake Pops: If you end up with leftover cupcakes (unlikely, but possible), crumble them, mix with a bit of frosting, and roll into cake pops for a fun, portable treat.
Making the Frosting Extra Special
The cream cheese frosting is non-negotiable for red velvet—no other frosting will do. The tanginess of the cream cheese plays off the subtle cocoa and buttermilk flavors in the cake in a way that a standard buttercream simply cannot replicate. For the smoothest, most professional-looking frosting, make sure to beat the cream cheese and butter together first until completely smooth before adding any sugar. Adding sugar to lumpy cream cheese will not fix the lumps—they will persist no matter how long you mix.
If you find your frosting is too soft to hold its shape for piping, pop it in the refrigerator for fifteen minutes to firm up slightly. However, don’t let it get too cold, or it will be difficult to pipe and may come out in rough, uneven lines.
Serving Suggestions
These cupcakes are meant to be seen! For a party, stack them on a white tiered cake stand to let the red and white colors pop dramatically. For gifts, place them in individual clear window boxes tied with a red silk ribbon—this makes for a stunning and thoughtful homemade present.
To make them look truly irresistible, top each cupcake with a tiny pinch of leftover red velvet cake crumbs—it gives a professional, cohesive look that screams high-end patisserie. You can make these crumbs by overbaking one cupcake intentionally, then crumbling it finely. A few white chocolate curls on top of the frosting also add an elegant touches.
These cupcakes pair beautifully with a glass of cold milk, a cup of tea, or even a glass of champagne for more festive occasions. They are equally at home at a children’s birthday party as they are at an elegant evening gathering.

About the Author
Makutu Bright
Software engineer and founder of Cracipes. Based in Kumasi, Ghana. Uses AI to curate the best recipes from across the internet.
Learn More
Submission Received!
Your review is in the kitchen being moderated.