Easy Tiramisu Parfaits: The Ultimate Creamy No-Bake Dessert
A Taste of Heaven in a Glass
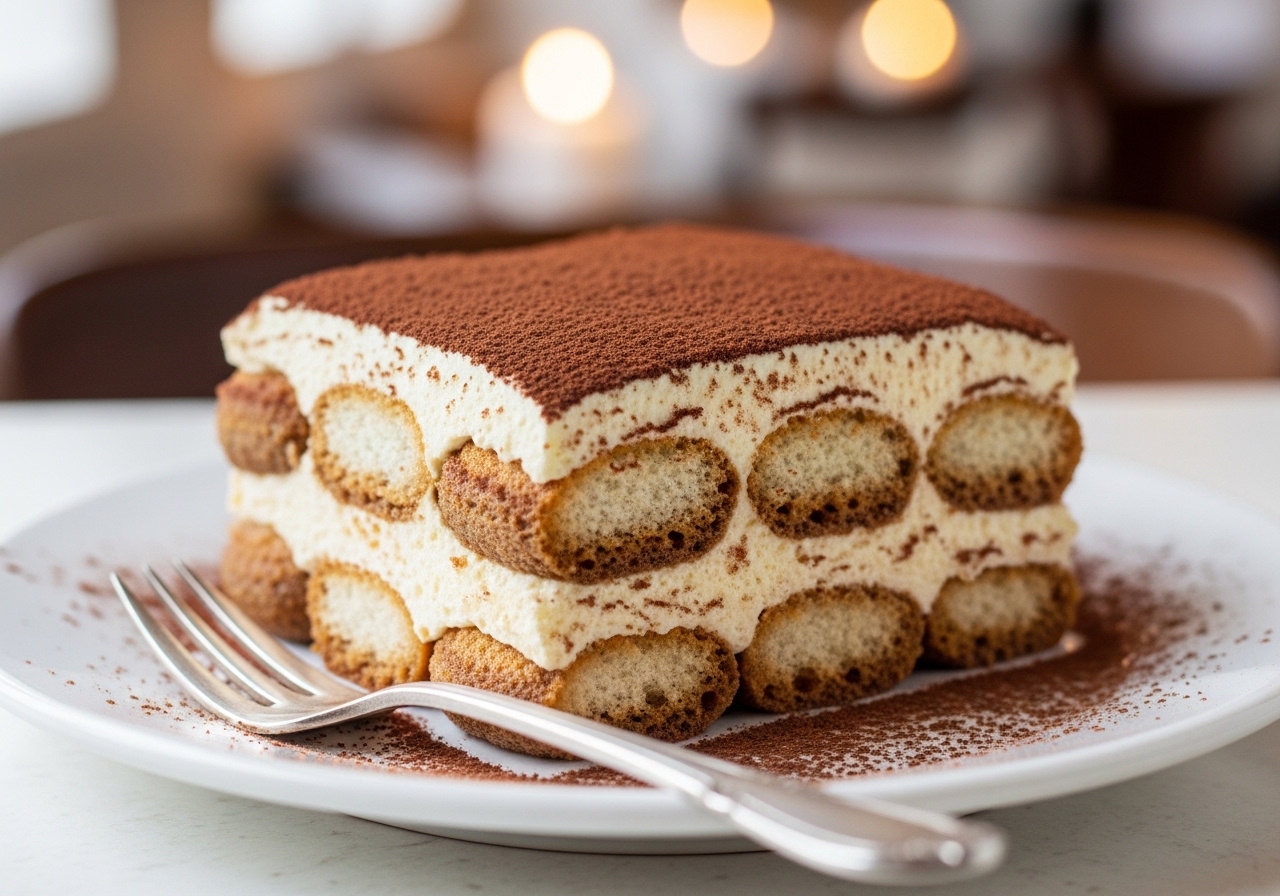
If you’re looking for a dessert that screams luxury without the hours of baking, look no further than these Tiramisu Parfaits. Imagine plunging your spoon into alternating layers of clouds: first, a velvety, whipped mascarpone cream, followed by the deep, robust punch of espresso-soaked ladyfingers. Each layer reveals itself as you dig deeper, the flavors building from sweet and creamy to bold and coffee-forward, finishing with the bitter elegance of dark cocoa powder on your lips.
This easy no-bake dessert is perfect for elegant entertaining or as a cozy, indulgent treat on a quiet Friday night. It’s light, sophisticated, and carries that classic Italian charm that everyone craves. The individual serving format makes them perfect for dinner parties because there’s no awkward slicing or serving—each guest gets their own perfectly portioned glass of heaven.
The Story Behind Tiramisu
Tiramisu, which translates to “pick me up” or “lift me up” in Italian, is one of the most famous desserts in the world, yet its exact origins remain charmingly disputed. The most widely accepted story credits the dessert to the Veneto region of northeastern Italy in the 1960s or 1970s, with several restaurants claiming to have invented it. Le Beccherie, a restaurant in Treviso, is most frequently cited as the birthplace, where pastry chef Roberto Linguanotto is said to have created the first version.
What is clear is that tiramisu emerged as a brilliant way to combine several Italian specialties—mascarpone cheese from Lombardy, espresso from the Italian coffee tradition, and savoiardi biscuits that have been baked in Italy since the 15th century. The genius of tiramisu is that it requires no baking at all. The dessert sets through refrigeration as the ladyfingers absorb the coffee and the cream firms up, creating layers that are distinct yet harmonious.
The parfait version of tiramisu takes the classic concept and makes it even more accessible and visually striking. By layering the components in clear glasses rather than assembling them in a large dish, you create individual servings that show off those beautiful layers from every angle.
Understanding the Key Components
The beauty of a tiramisu parfait lies in its simplicity. We focus on three core elements to create that creamy dessert experience, and getting each one right is the difference between a good tiramisu and an extraordinary one:
-
The Coffee Soak: We use a high-quality, strong espresso, cooled to room temperature. The intensity of the coffee is critical because the ladyfingers will dilute its flavor as they absorb the liquid. A weak coffee will result in a bland tiramisu. If you don’t have an espresso machine, strong French press coffee or moka pot coffee works well. Some recipes add a tablespoon of coffee liqueur like Kahlúa to the espresso, which adds depth and a sophisticated boozy warmth. The ladyfingers should be dipped quickly—just long enough to absorb the flavor on the outside without becoming soggy and falling apart.
-
The Mascarpone Cloud: This is the soul of the tiramisu. Mascarpone is a soft, creamy Italian cheese with a delicate, slightly sweet flavor and an incredibly smooth texture. We combine it with heavy cream and powdered sugar, then whip the mixture until it reaches a thick, cloud-like consistency. The key to perfect mascarpone cream is not overwhipping—you want it to hold soft peaks that are still smooth and spreadable, not stiff and grainy. Mascarpone can become lumpy if beaten too aggressively, so use gentle, folding motions once the cream is incorporated. The vanilla extract rounds out the sweetness and adds an aromatic warmth that complements the coffee beautifully.
-
The Cocoa Finish: A final, generous dusting of dark unsweetened cocoa powder adds that essential bitter contrast to the sweet cream. This is not just a garnish—it is a flavor component that is fundamentally important to the balance of the dessert. The bitterness of the cocoa plays against the sweetness of the cream and the intensity of the coffee, creating a three-way harmony that keeps your palate engaged from the first bite to the last. Use high-quality Dutch-process cocoa for the smoothest, richest flavor and the most dramatic dark color.
Step-by-Step Preparation: Layering the Dream
-
Prep the Cream: In a chilled bowl—placing the bowl in the refrigerator for fifteen minutes beforehand helps the cream whip faster and more stably—combine the mascarpone, heavy cream, powdered sugar, and vanilla. Whisk by hand or with an electric mixer on medium speed until soft peaks form. The mixture should be thick enough to hold its shape when spooned but still smooth and flowing, not stiff or grainy. Be careful not to overbeat, as mascarpone can go from silky to broken very quickly. If you notice it starting to look curdled, stop immediately.
-
Brew and Cool the Espresso: Brew your espresso or strong coffee and let it cool to room temperature. If you’re in a hurry, spread the espresso in a shallow dish—the increased surface area will cool it faster. Pour the cooled espresso into a shallow bowl or plate deep enough for dipping.
-
The First Layer: Snap the ladyfingers into pieces that fit your serving glasses. Quickly dip each piece into the cooled espresso—literally a one to two second dip on each side is all you need. The outside should be saturated but the center should still be slightly dry. This ensures the ladyfingers soften into a cake-like texture over time without becoming a soggy, falling-apart mess. Create a snug base layer in each glass.
-
The Mascarpone Blanket: Spoon or pipe a generous layer of the mascarpone mixture over the ladyfingers. Piping creates cleaner, more defined layers that look spectacular through the glass, but spooning works perfectly fine for a more rustic, homemade look. Smooth the surface with the back of a spoon for a clean visual line.
-
Repeat the Magic: Add another layer of espresso-soaked ladyfingers, followed by a final, generous layer of cream. For taller glasses, you can do three layers of each, alternating ladyfingers and cream for a more dramatic presentation.
-
Chill and Settle: Cover each glass with plastic wrap and let the parfaits rest in the refrigerator for at least two hours, though four to six hours is even better. Overnight is ideal. During this resting time, the flavors meld together beautifully, the ladyfingers soften into a rich, cake-like texture as they absorb moisture from both the espresso and the cream, and the whole dessert develops a cohesive, harmonious flavor that freshly assembled tiramisu simply doesn’t have.
-
The Grand Finale: Just before serving, dust each glass generously with unsweetened cocoa powder using a fine-mesh sieve for an even, elegant coating. Add chocolate shavings if desired—use a vegetable peeler along the edge of a chocolate bar for beautiful curls.
Tips & Tricks for Perfect Results
- Go Vertical: Use clear stemless wine glasses, mason jars, or tall tumblers to show off those beautiful, distinct layers. The visual contrast between the dark espresso-soaked ladyfingers and the white cream is the entire point of the parfait format.
- Piping is Key: For the most professional look, use a pastry bag or a zip-lock bag with a corner cut off to pipe the mascarpone cream. It creates a cleaner, more defined line between layers than spooning.
- Don’t Over-Soak: A quick one to two second dip is all you need for the ladyfingers. If they sit too long in the espresso, they lose their structural integrity and fall apart, turning the parfait into a mush rather than a layered dessert. The ladyfingers will continue to absorb moisture from the cream during the chilling time, so they will be perfectly soft when served.
- Temperature Matters: Ensure your mascarpone and heavy cream are very cold before whipping to get the maximum volume and stability. Cold dairy whips more easily and holds its shape longer.
- Make Ahead Advantage: These parfaits actually improve with time, making them the perfect make-ahead dessert for dinner parties. Assemble them the night before, keep them covered in the refrigerator, and add the cocoa dusting just before serving.
Creative Variations
Feeling adventurous? Try these twists to make your parfaits stand out:
- Berry Bliss: Add a layer of fresh raspberries or a strawberry compote between the cream and coffee for a fruity pop that adds color and a tart contrast to the richness.
- Chocolate Overload: Grate some dark chocolate directly onto the mascarpone layers for extra texture and richness, or fold chocolate chips into the cream itself.
- Luxe Liqueur: Stir a tablespoon of Amaretto, Kahlúa, or Frangelico into the espresso for a deeper, more sophisticated flavor profile. Marsala wine is the traditional Italian choice.
- Matcha Tiramisu: Replace the espresso with concentrated matcha green tea for a stunning green and white color scheme with earthy, slightly bitter flavor notes.
- Nutella Layer: Add a thin layer of Nutella between the ladyfingers and the cream for a hazelnut-chocolate dimension that is irresistibly indulgent.
Serving Suggestions
These parfaits are the ultimate elegant dessert for any occasion. For a dinner party, serve them on a wooden board with a few whole coffee beans scattered around and a side of crisp almond biscotti for dipping. The contrast of the warm wood, the glossy glasses, and the dark cocoa topping creates a stunning tablescape.
If you’re hosting brunch, pair them with a mimosa or a hot latte. They are naturally beautiful because of their striking contrast between the white cream and the dark, coffee-stained layers, making them incredibly photogenic from every angle.
For a romantic dessert for two, serve the parfaits with two long-handled dessert spoons and a shared plate of fresh berries. There is something wonderfully intimate about digging through those layers together, discovering the flavors as you go.

About the Author
Makutu Bright
Software engineer and founder of Cracipes. Based in Kumasi, Ghana. Uses AI to curate the best recipes from across the internet.
Learn More
Submission Received!
Your review is in the kitchen being moderated.