Japanese Chicken Katsu Curry
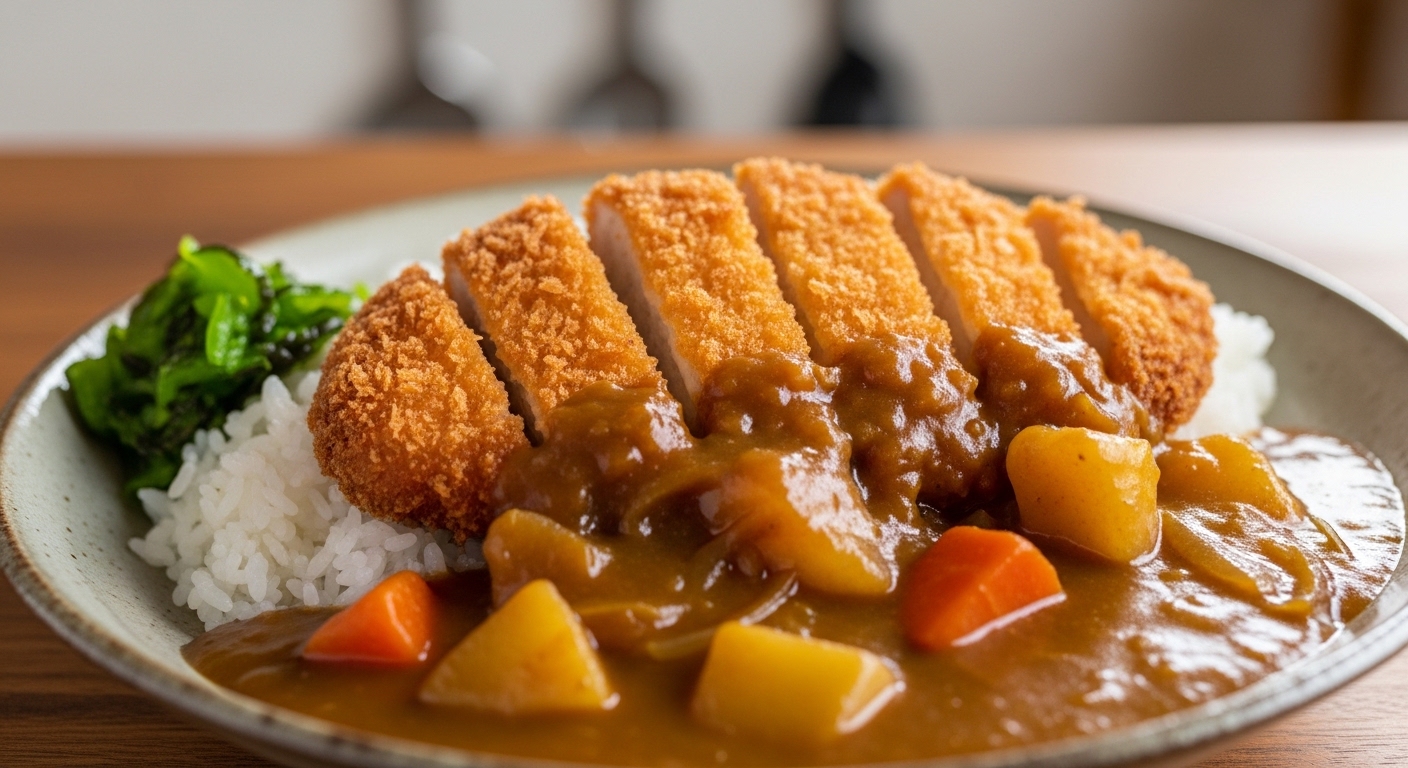
Japanese curry—“kare raisu”—holds a unique and beloved place in Japanese cuisine. Unlike the intensely spiced, fiery curries of India or Thailand, Japanese curry is mild, sweet, velvety smooth, and deeply comforting. It’s the kind of food that almost every Japanese person has strong childhood memories of—coming home from school to find a pot of curry bubbling on the stove, the warm, sweet aroma filling the entire house. It’s been voted Japan’s favorite food in multiple national surveys, beating out sushi and ramen. When you top it with a shattering-crisp chicken katsu cutlet, it becomes something genuinely transcendent—the contrast between the crunchy, golden exterior of the chicken and the smooth, aromatic curry sauce is one of the most satisfying textural combinations in cooking.
The History of Japanese Curry
Japanese curry has a fascinating lineage. Curry didn’t arrive in Japan from India—it came from Britain, which had adopted and adapted Indian curry during the colonial era. When the Japanese navy began adopting British naval customs in the late nineteenth century, curry was introduced as a naval mess hall food because it was easy to make in large quantities and kept well at sea. The Japanese adapted it to local tastes, making it sweeter, milder, and thicker than its Indian ancestor. It was initially a luxury food, but by the mid-twentieth century, with the introduction of instant curry roux blocks, it became one of the most common home-cooked meals in Japan.
Today, Japanese curry holds a cultural position similar to what mac and cheese or meatloaf holds in American cooking—pure, nostalgic, everyday comfort food that almost everyone loves. The fact that it’s easy to make is part of its charm. While you can absolutely use store-bought curry roux blocks (and they’re genuinely good—brands like S&B Golden Curry and Vermont Curry are universally popular in Japan), making the sauce from scratch gives you more control over the flavor and produces a cleaner-tasting, more nuanced result.
Making the Curry Sauce from Scratch
-
Sauté the aromatics: Melt the butter in a medium saucepan over medium heat. Add the diced onion and cook, stirring regularly, for about ten to twelve minutes until deeply golden brown. This long cooking time is essential—the caramelized onions provide the natural sweetness that characterizes Japanese curry. Add the diced carrots, garlic, and grated ginger, and cook for another three minutes.
-
Make the roux: Sprinkle the flour over the vegetables and stir continuously for about two minutes. The flour coats the vegetables and begins to cook, which will thicken the sauce. Add the curry powder, garam masala, and turmeric, and stir for another minute until the spices bloom and become fragrant. This step creates a roux similar to what you’d make for a French béchamel—Japanese curry technique is actually much closer to French sauce-making than to Indian curry-making, which makes sense given its British colonial origins.
-
Build the sauce: Gradually pour in the chicken stock, stirring constantly to prevent lumps from forming. Add the soy sauce, honey, and Worcestershire sauce. The combination of these condiments is quintessentially Japanese—the soy sauce adds umami depth, the honey provides sweetness, and the Worcestershire sauce (which is extremely popular in Japanese cooking) adds a complex, fruity tanginess.
-
Simmer and smooth: Bring the sauce to a gentle simmer and cook for about twenty minutes, stirring occasionally, until the carrots are tender and the sauce has thickened to a velvety consistency that coats the back of a spoon. For an ultra-smooth sauce, you can blend part or all of it with an immersion blender, though leaving some carrot pieces intact provides welcome texture.
Taste the curry and adjust—it might need a touch more honey if it’s not sweet enough, a splash more soy sauce for saltiness, or a squeeze of lemon juice if it tastes flat. Japanese curry should be mellow and balanced, not sharp or aggressively spiced.
Preparing the Chicken Katsu
The katsu technique is a classic Japanese frying method that produces an extraordinarily crispy coating thanks to the use of panko breadcrumbs.
-
Prepare the chicken: If the chicken breasts are thick, butterfly them or pound them to an even half-inch thickness between two sheets of plastic wrap. Even thickness is critical—it ensures the entire cutlet cooks at the same rate, so you don’t end up with dry edges and a raw center. Season both sides generously with salt and pepper.
-
Set up the breading station: Arrange three shallow dishes—one with flour, one with beaten eggs, and one with panko breadcrumbs. Dredge each chicken breast in flour first (this helps the egg adhere), then dip in the beaten egg (coating all surfaces), then press firmly into the panko on both sides. Press the panko in with your palms to create a dense, even coating. The coating should be thick and uniform—any thin spots will result in patchy, uneven crisping.
-
Fry the cutlets: Heat about an inch of vegetable oil in a deep skillet or Dutch oven to 350°F (175°C). Gently lower the breaded cutlets into the oil—don’t overcrowd the pan. Fry for about four to five minutes per side until the coating is deep golden brown and the chicken reaches an internal temperature of 165°F (74°C). The key to crispy katsu is maintaining steady oil temperature—adjust the burner as needed and use a thermometer.
-
Rest and slice: Transfer the fried cutlets to a wire rack set over a sheet pan. Let them rest for about three minutes—this allows the residual heat to finish cooking the center, and the coating stays crispy because it’s not sitting in its own steam (which is what happens when you drain on paper towels). Slice the katsu into strips about three-quarters of an inch wide, keeping the pieces together so the cutlet maintains its shape on the plate.
Assembling the Dish
Mound steamed Japanese short-grain rice on one side of a wide, shallow bowl or plate. Lean the sliced katsu against the rice, fanning the strips slightly to show off the contrast between the golden crust and the juicy white interior. Ladle the curry sauce generously alongside, letting it pool around the rice and lap at the edges of the katsu. Garnish with pickled ginger, a small pile of fukujinzuke (the sweet pickled relish that traditionally accompanies Japanese curry), or simply a sprinkle of fresh scallions.
Tips for the Best Results
- Panko vs. regular breadcrumbs: Panko breadcrumbs are made from crustless white bread using an electrical current that creates the airy, flaky texture. Regular breadcrumbs are ground finer and produce a denser, less crispy coating. For katsu, panko is non-negotiable.
- Double-fry technique: For even crispier katsu, fry the cutlets at 325°F for three minutes, remove them for five minutes, then fry again at 375°F for two minutes until deeply golden. This technique (borrowed from double-fried French fries) creates a shatteringly crisp exterior.
- Make extra curry sauce: The sauce freezes beautifully for up to three months. Keep individual portions in the freezer for quick weeknight meals—just thaw, reheat, and serve with fresh katsu or even just over rice.
- Pork variation: Traditional tonkatsu uses pork loin instead of chicken. The preparation is identical, but the frying time may be slightly longer since pork needs to reach 145°F (63°C).

About the Author
Makutu Bright
Software engineer and founder of Cracipes. Based in Kumasi, Ghana. Uses AI to curate the best recipes from across the internet.
Learn More
Submission Received!
Your review is in the kitchen being moderated.