Perfect Homemade Margherita Pizza
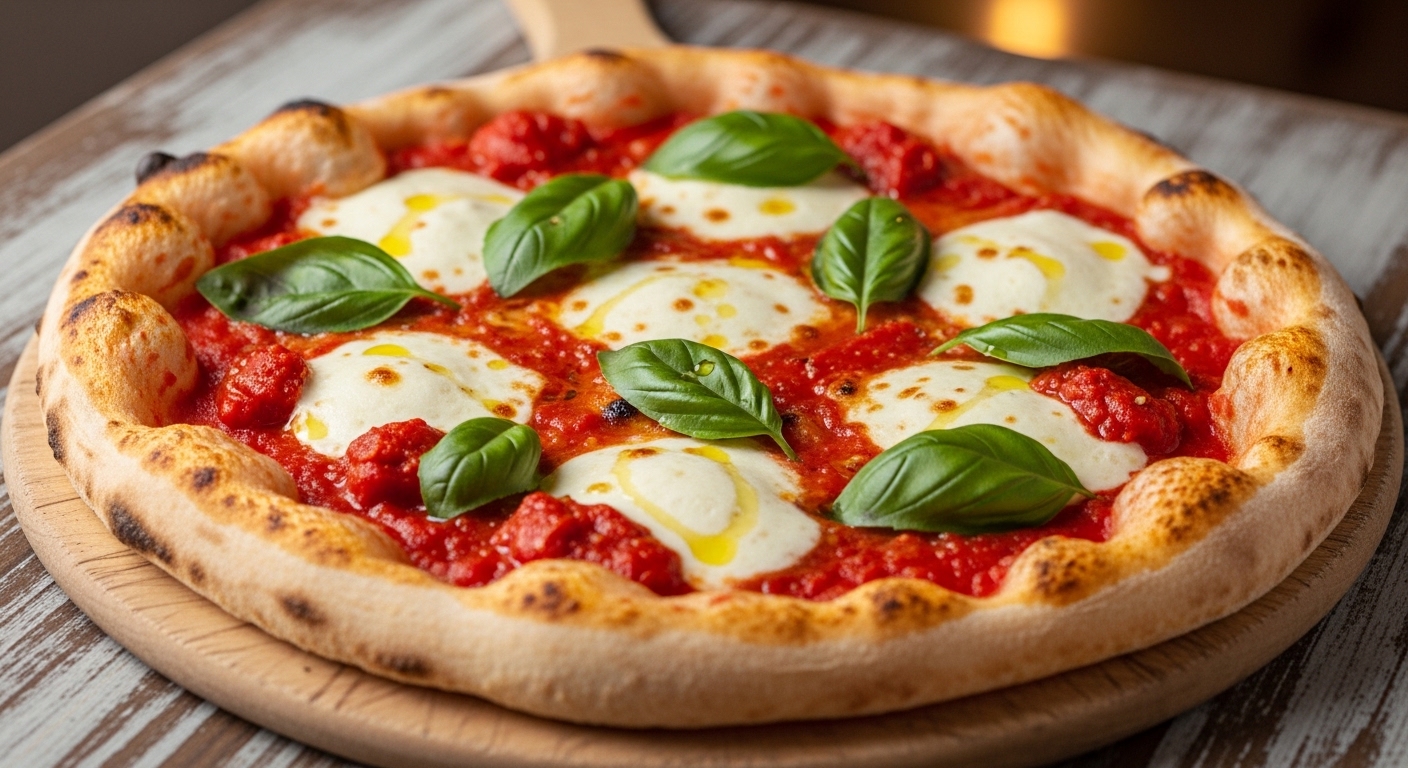
A Margherita pizza is the ultimate test of a pizzaiolo’s skill precisely because there’s absolutely nothing to hide behind. Three toppings: tomato, mozzarella, basil. That’s it. When a pizza has only three ingredients on top, each one has to be exceptional, and the crust—which in most other pizza styles plays a supporting role—becomes the star of the show. A great Margherita should have a crust that’s simultaneously chewy and crisp, with those signature charred leopard spots from the intense heat. The sauce should taste like ripe, sweet tomatoes at the peak of summer, barely cooked. The mozzarella should melt into creamy pools without releasing so much liquid that the center turns soggy.
The Dough is the Foundation
If you take one thing away from this recipe, let it be this: great pizza starts with great dough, and great dough starts with time. A dough that’s been mixed, kneaded, and baked in the same afternoon will never have the depth of flavor and the complex texture of a dough that’s been slowly fermented for twenty-four to seventy-two hours.
During a long, slow fermentation (especially under refrigeration), the yeast works gradually, producing not just carbon dioxide for leavening but also ethanol and a host of organic acids and aromatic compounds that contribute to flavor. The long ferment also allows enzymes in the flour to break down complex starches into simpler sugars, which caramelize during baking and contribute to the beautiful spotted browning pattern on the crust. If you enjoy dough-based recipes that reward patience, our Homemade Sourdough Bread uses a similar slow-fermentation philosophy with wild yeast.
Making the dough: Combine the flour and salt in a large bowl. Dissolve the yeast in the lukewarm water and add the olive oil. Pour the liquid into the flour and mix until a shaggy dough forms—no dry flour remaining. Turn it out onto a clean surface and knead for about ten minutes. The dough should be smooth, elastic, and slightly tacky but not sticky. If it sticks to your hands, resist the urge to add more flour—just keep kneading and it will come together.
Place the dough in a lightly oiled container, cover tightly, and refrigerate for at least twenty-four hours. Forty-eight hours is even better. The cold slows the yeast dramatically, extending the fermentation and developing more flavor. When you’re ready to bake, remove the dough from the fridge, divide it into four equal pieces, and shape each piece into a tight ball. Let the dough balls rest at room temperature for at least two hours to relax the gluten and warm up—cold dough is stiff and will spring back when you try to stretch it.
The Sauce: Less is More
Authentic Neapolitan pizza sauce is not cooked at all. The raw tomatoes cook on the pizza in the oven, which preserves their bright, fresh flavor. This is a fundamentally different approach from the slow-simmered, heavily seasoned tomato sauce you might use on a pasta dish—and it’s intentional. You want the tomatoes to taste like tomatoes, not like a spice blend.
Crush a can of whole San Marzano tomatoes by hand, squeezing each tomato through your fingers. (San Marzano tomatoes, grown in the volcanic soil near Mount Vesuvius, have a higher flesh-to-seed ratio, lower acidity, and a sweeter, more concentrated flavor than other canned varieties.) Add a tiny grate of garlic, a drizzle of olive oil, a pinch of dried oregano, and salt. That’s it. Taste it—it should taste bright, sweet, and clean. If your tomatoes are particularly acidic, a tiny pinch of sugar can help, but good San Marzanos rarely need it.
Stretching and Topping
-
Stretch the dough: Place a dough ball on a lightly floured surface. Starting from the center and working outward, press and stretch the dough with your fingertips, leaving a one-inch border around the edge that you don’t press down—this becomes the puffy, charred cornicione (the raised rim). Pick up the dough and drape it over your knuckles, letting gravity help stretch it. Rotate it as you stretch, working it into about a ten to twelve inch round. Don’t use a rolling pin—it compresses the gas bubbles that give the crust its light, airy texture.
-
Sauce sparingly: Spoon about three tablespoons of sauce onto the center of the stretched dough and spread it in a thin, even layer using the back of the spoon in a spiral motion, leaving the border clean. One of the most common mistakes is using too much sauce, which makes the center of the pizza soggy. A thin layer is all you need—the tomato flavor will concentrate as the water evaporates during baking.
-
Add the mozzarella: Tear the fresh mozzarella into irregular pieces rather than slicing it—the torn edges melt more interestingly and create a more rustic, authentic appearance. Distribute the pieces evenly but not too densely. Much like the sauce, less is more. You want to see tomato sauce between the cheese, not a wall-to-wall blanket of mozzarella.
Baking in a Home Oven
Professional pizza ovens reach 800-900°F. Your home oven maxes out around 500-550°F, but you can still get excellent results with a few tricks.
Use a pizza steel or stone: Preheat it on the highest rack position at your oven’s maximum temperature for at least one hour. The thermal mass of the steel or stone stores an enormous amount of heat and transfers it directly to the bottom of the pizza, crisping the crust in minutes.
Broiler method: Once your pizza is on the steel, switch the oven from bake to broil. The intense radiant heat from the broiler element mimics the dome heat of a wood-fired oven, blistering the top of the pizza and charring the cornicione. A pizza should take about five to seven minutes using this method.
Add the basil after baking: Fresh basil leaves blacken and turn bitter if they’re exposed to high heat. Tear them and scatter them over the pizza immediately after it comes out of the oven. Add a drizzle of your best extra virgin olive oil and a pinch of flaky sea salt.
Common Mistakes to Avoid
- Too many toppings: A Margherita is defined by restraint. Piling on additional ingredients defeats the purpose and weighs down the dough, resulting in a soggy, undercooked center. Stick to the three essentials: tomato, mozzarella, basil.
- Cold or wet mozzarella: Fresh mozzarella is packed in liquid. Remove it from the water at least thirty minutes before using, and pat it dry with paper towels. Excess moisture is the number one cause of soggy pizza centers.
- Not preheating long enough: The stone or steel needs a full hour at maximum temperature to store enough heat to properly crisp the bottom. Rushing this results in a pale, floppy crust.
- Thick dough: A Margherita crust should be stretched thin enough that you can almost see light through the center. If it’s thick and bready, it’s not right for this style.
- Using a rolling pin: This compresses the gas bubbles that give Neapolitan crust its light, airy texture. Always stretch by hand, working from the center outward and leaving the rim untouched.
Why Margherita Pizza Matters
The legend says that in 1889, pizzaiolo Raffaele Esposito created the Margherita pizza to honor Queen Margherita of Savoy, using tomato, mozzarella, and basil to represent the red, white, and green of the Italian flag. While historians debate the accuracy of this story, the pizza itself has endured as one of the most iconic dishes in Italian cuisine. It represents the Italian philosophy of cooking at its purest: take a few outstanding ingredients, treat them simply and respectfully, and let their natural qualities speak for themselves. For another classic Italian dish built on the same philosophy of few ingredients done right, check out our Spaghetti Carbonara.
My Kitchen Notes
The single best upgrade I made to my home pizza was investing in a pizza steel instead of a stone. The steel conducts heat more efficiently, which means the bottom of the crust crisps faster and more evenly. It also doesn’t require as long a preheat—I get great results with forty-five minutes instead of a full hour.
Temperature management is everything with pizza. I now keep my dough balls at room temperature for a minimum of two hours before stretching, and three hours is even better. Cold dough fights you at every step—it shrinks back, tears, and won’t stretch thin. Room-temperature dough is relaxed, pliable, and practically shapes itself.
I learned the hard way that San Marzano tomatoes really do matter. I tried substituting regular canned tomatoes for a few months and the sauce was noticeably more acidic and less sweet. The difference in a three-ingredient sauce is amplified because there’s nothing else to mask the tomato quality. It’s worth seeking out the real DOP-certified San Marzanos.
The broiler method changed my home pizza game completely. I used to bake at 500°F and wonder why my crust was pale and soft. Switching to broil for the last two minutes of baking created those charred leopard spots and blistered crust that I thought were impossible without a wood-fired oven.
Storage & Meal Prep Tips
Pizza dough is one of the best meal prep items you can make. Divide the dough into individual balls after the initial bulk rise, wrap each tightly in plastic wrap or place in oiled containers, and refrigerate for up to seventy-two hours. The longer cold ferment develops more flavor. Remove from the refrigerator two hours before baking to let the dough relax and come to room temperature.
Baked Margherita pizza is best eaten fresh, but leftovers keep in the refrigerator for up to three days. Reheat in a hot oven (450°F) for about five minutes rather than the microwave, which will make the crust rubbery. You can also freeze unbaked dough balls for up to three months—thaw overnight in the refrigerator, then bring to room temperature before stretching.
The raw tomato sauce can be made a day ahead and refrigerated in a sealed container. In fact, the sauce improves slightly overnight as the garlic and oregano have time to infuse into the tomatoes. Make a double batch and use the remainder for pasta the next day.
For entertaining, I prep all the dough balls and have the sauce ready in advance. When guests arrive, I stretch and bake pizzas to order—it takes about seven minutes per pizza and everyone gets a fresh, hot Margherita straight from the oven. It’s the most impressive low-effort dinner you can serve.
Frequently Asked Questions
Can I use regular mozzarella instead of fresh?
You can, but the result will be different. Regular low-moisture mozzarella melts more evenly and releases less water, which some people actually prefer for a less soggy center. However, fresh mozzarella creates those beautiful creamy white pools and a more authentic Neapolitan appearance. For the true Margherita experience, fresh mozzarella is the way to go—just make sure to drain it well.
Why does my pizza dough keep shrinking back when I try to stretch it?
The gluten in the dough is too tight. This happens when the dough hasn’t rested long enough at room temperature, or when you’re trying to stretch it too quickly. Let the dough ball rest on the counter for at least two hours, then stretch gently and slowly. If it resists, set it down for five minutes and come back to it—the gluten will have relaxed.
Do I need a pizza stone or steel?
For the best crust, yes. A pizza steel or stone provides the thermal mass needed to crisp the bottom of the pizza quickly at high heat. Without one, you’ll be baking on a thin metal pan that can’t hold enough heat, resulting in a softer, paler crust. A steel is more durable and conducts heat better, but a stone works well too. Both need to preheat at your oven’s maximum temperature for at least forty-five minutes.
Can I make this dough with all-purpose flour?
Bread flour or Tipo 00 flour is strongly preferred because their higher protein content develops the strong gluten network needed for a chewy, stretchy crust. All-purpose flour has less protein and will produce a more tender, cracker-like texture that isn’t ideal for Neapolitan-style pizza. If you only have all-purpose, you can use it—the pizza will still taste good, but the texture will be noticeably different.
How thin should I stretch the dough?
For a classic Margherita, the center should be very thin—thin enough that you can almost see light through it when you hold it up. The outer inch should remain thick to form the puffy cornicione. The goal is an uneven, rustic shape with a dramatically puffed rim and a thin, almost translucent center. Don’t aim for a perfectly round, uniform pizza—that’s not the Neapolitan style.

About the Author
Makutu Bright
Software engineer, founder of Cracipes, and passionate home cook based in Kumasi, Ghana. BSc from KNUST, trained at AltSchool Africa. Combines food science research with real-world cooking experience to create reliable, well-tested recipes.
View All Recipes & Full Bio
Submission Received!
Your review is in the kitchen being moderated.